Desktop-Based Artificial Intelligence

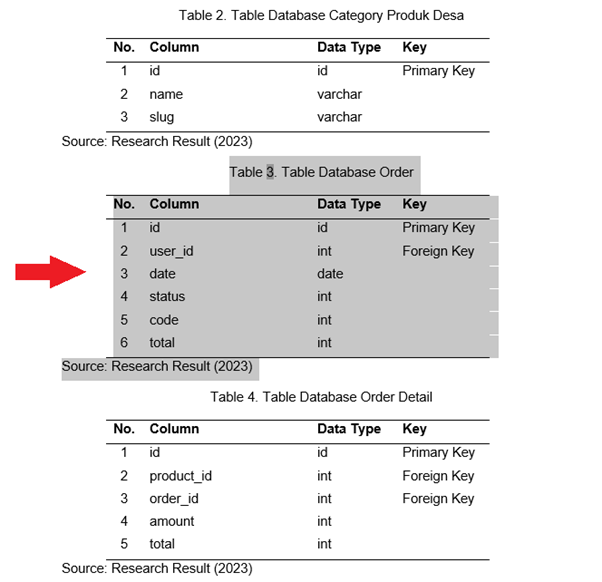
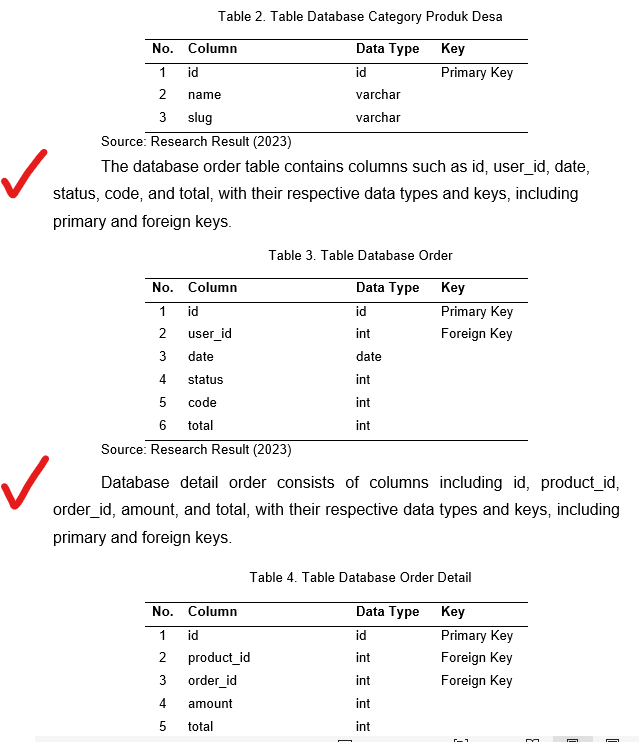
Saat ini aplikasi dengan memanfaatkan AI sudah banyak beredar. Aplikasi-aplikasi tersebut bisa berupa desktop yang dijalankan secara lokal di komputer, web dengan server web yang menjalankan AI maupun Android. Masing-masing memiliki keunggulan. Walaupun saat ini aplikasi berbasis desktop banyak ditinggalkan tetapi karena AI terkadang memerlukan sumber daya yang besar, yang saat ini sudah berupa big data, aplikasi desktop unggul dalam hal itu. Disamping itu, aplikasi berupa desktop, dengan executable application, lebih aman baik dari sisi serangan virus dari jaringan, maupun pencurian kode sumber. Postingan kali ini mengilustrasikan bagaimana proses AI dari training, hingga deployment dalam bentuk desktop application.

Currently, there are many AI applications available that can be deployed in various forms, such as desktop applications running locally on a computer, web applications with AI-powered web servers, or Android applications. Each of these forms has its advantages. Although desktop-based applications are being less favored nowadays, they excel in handling AI tasks that require significant resources, especially when dealing with big data. Furthermore, desktop applications, with their executable files, offer better security against network-based virus attacks and source code theft. This post illustrates the process of AI, starting from training to deployment in the form of a desktop application.

A. Training

Sebagai ilustrasi, di sini kita membuat AI yang memprediksi spesies bunga berdasarkan IRIS datasets yang dapat diunduh dari sini. Gunakan Visual Studio code atau editor lainnya untuk melatih model, misalnya Support Vector Machine (SVM) yang ada pada library Scikit Learn.

As an illustration, here we create an AI that predicts flower species based on the IRIS dataset, which can be downloaded from here. Use Visual Studio Code or any other editor to train the model, for example, using the Support Vector Machine (SVM) algorithm from the Scikit-Learn library.

Ketika dijalankan kode di atas akan melatih model SVC dari Iris Dataset (‘iris.csv’). Di sini penyimpanan dengan library Joblib (bisa juga dengan pickle). Tampak akurasi 100% berdasarkan data uji (20% dari datasets).

When running the above code, it will train an SVC model using the Iris Dataset (‘iris.csv’). In this case, the model is saved using the Joblib library (you can also use pickle). It appears that the accuracy is 100% based on the test data (20% of the dataset).

B. Prediction

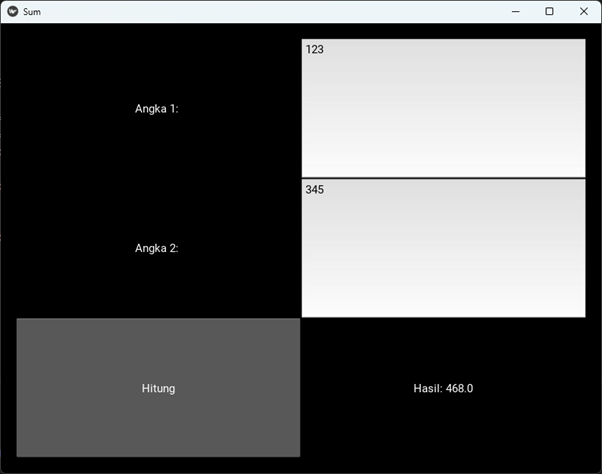
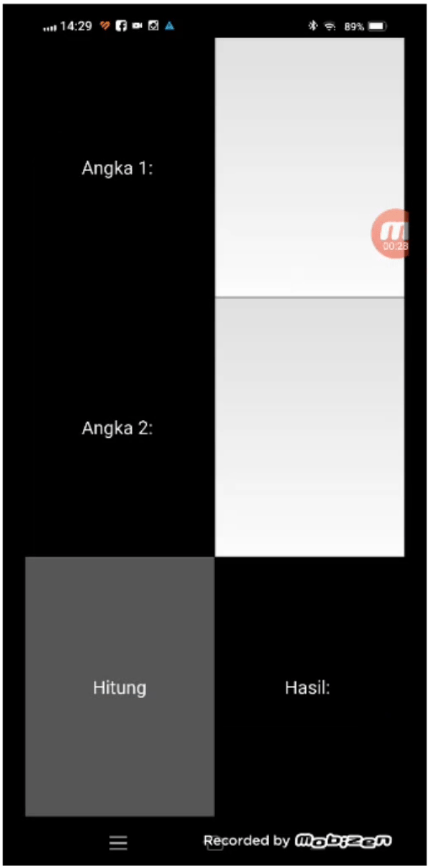
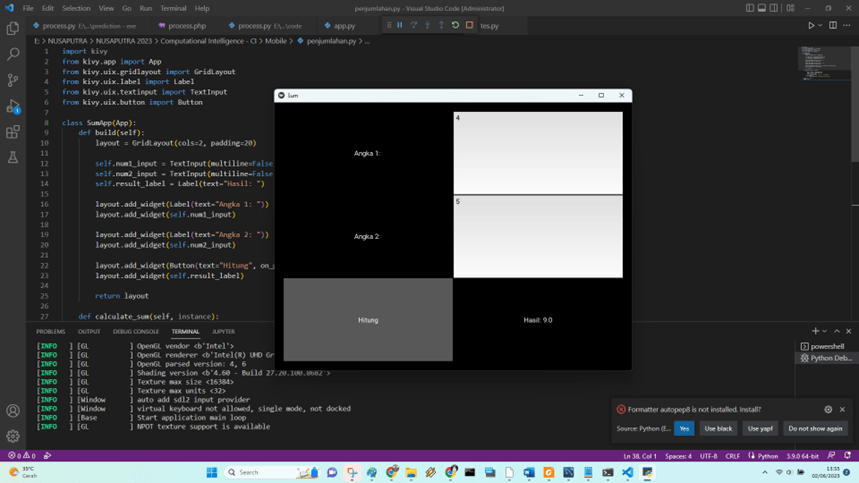
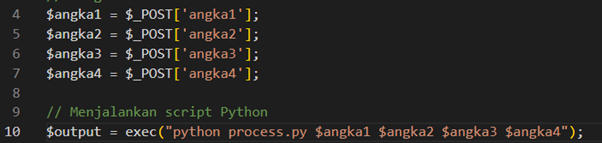
Berikutnya adalah prediksi menggunakan GUI dari TKinter. Bisa juga dengan kivy, tapi ternyata ada masalah ketika di-compile menjadi exe. Silahkan tanya ChatGPT untuk menjalankan model hasil training (di sini diberi nama save_model.pkl).

Next is the prediction using a GUI made with Tkinter. It can also be done with Kivy, but there seems to be an issue when compiling it into an executable. Please ask ChatGPT to run the trained model (named save_model.pkl) for you.

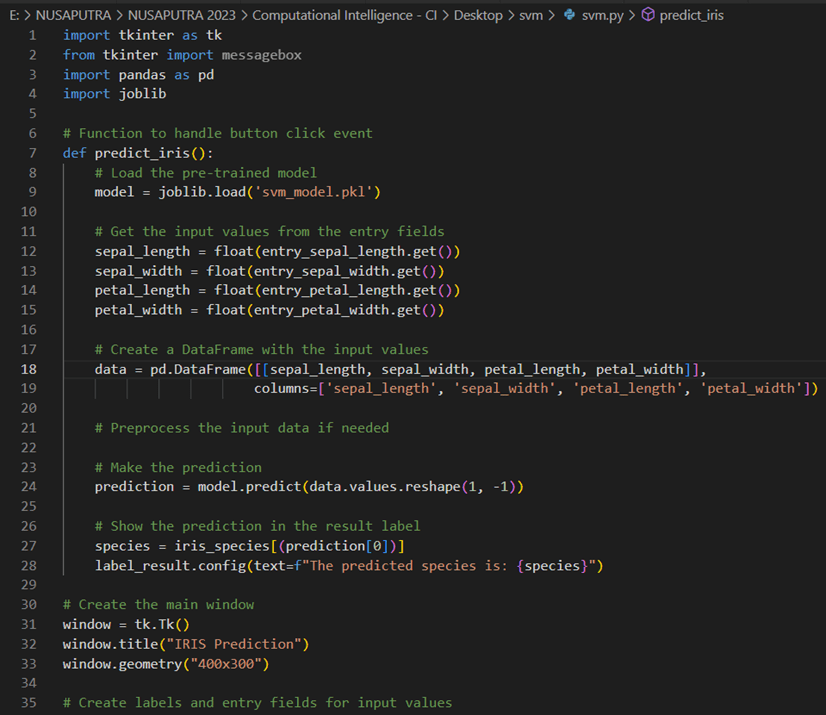
Sebelum dikompilasi menjedi exe, terlebih dahulu cek dengan menjalankan kode tersebut, bisa dengan run – run without debugging (Ctrl F5) atau dengan terminal: python svm.py jika kode di atas disimpan dengan nama svm.py.

Before compiling it into an executable (exe) file, it is recommended to first check the code by running it. You can do this by either using “Run – Run Without Debugging” (Ctrl+F5) in your editor or by running the code in the terminal using the command “python svm.py” if the code is saved with the name “svm.py”.

Jika sudah benar (bandingkan dengan file exe iris.csv) apakah sudah sesuai jawabannya. Jika sudah kita mulai mengkompilasinya.

If the results are correct (compare them with the results from the exe file using iris.csv), then it seems to be working fine. If everything is correct, you can proceed with the compilation process.
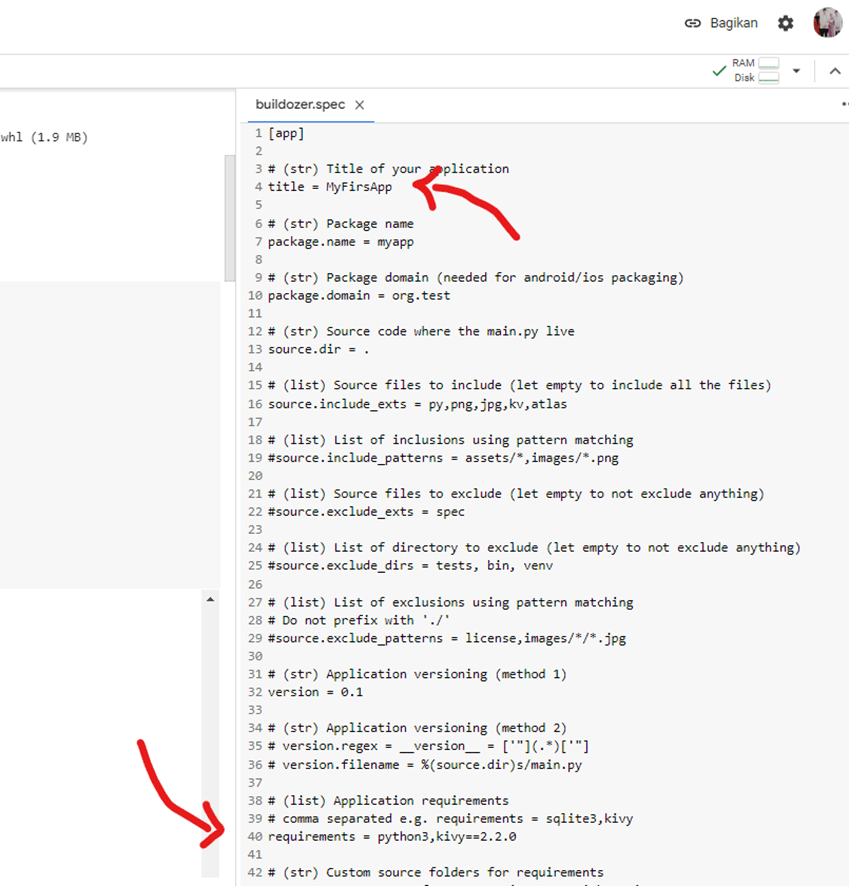
C. Compile to Exe

Salah satu library terkenal untuk kompilasi adalah pyinstaller. Jalankan dengan mengetik:

One of the famous libraries for compilation is PyInstaller. Run the following command:

pyinstaller –onefile -w svm.py

Proses kompilasi membutuhkan waktu yang lama, sekitar 20 menit jika membutuhkan library-library tertentu, misal tensorflow, sklearn, dan lain-lain. Jika berhasil akan muncul file exe di folder dist yang terlebih dahulu dipindah di lokasi yang sama dengan model yang sudah dilatih (save_model.pkl) agar bisa dijlankan. Selamat, Anda telah berhasil membuat aplikasi desktop yang dapat dijalankan tanpa membutuhkan Python. Bandingkan, file py yang tadinya berukuran 3 Kb menjadi file exe yang berukuran 500-an Mb.

The compilation process can take a long time, around 20 minutes, especially if it requires specific libraries like TensorFlow, scikit-learn, and others. If successful, an executable file will appear in the `dist` folder. Move this file to the same location as the trained model file (`save_model.pkl`) so that it can be executed. Congratulations! You have successfully created a desktop application that can be run without requiring Python. Compare the file sizes, where the original `.py` file was around 3 KB, and the compiled `.exe` file is in the range of a few hundred MBs.

Silahkan lihat video Youtube berikut untuk lebih jelasnya. Please refer to the following YouTube video for a more detailed explanation:

Desktop-Based Python Application

Aplikasi komputer dapat berjalan lewat desktop, web, maupun mobile. Masing-masing memiliki kelemahan dan kelebihan. Postingan kali ini membahas bagaimana membuat aplikasi desktop pada Python.

Computer applications can run on desktop, web, or mobile platforms. Each platform has its own strengths and weaknesses. In this post, we will discuss how to create a desktop application using Python.

Pada dasarnya Python seperti Java, PHP, dan lain-lain merupakan interpreter, dimana untuk menjalankan suatu aplikasi dengan terlebih dahulu menginstal sejenis runtime. Untuk Python tentu saja menginstal Python terlebih dahulu, baik versi 2 maupun 3. Dan ketika menjalankan lewat instruksi di terminal:

Basically, Python, like Java, PHP, and others, is an interpreter where running an application requires installing a runtime of a similar kind. For Python, you need to install Python itself first, either version 2 or 3. When running it through instructions in the terminal:

python <nama_aplikasi>.py

Walaupun itu merupakan jenis desktop, tetapi masih memerlukan instalasi Python di dalamnya. Nah, bagaimana membuat aplikasi desktop yang berjalan tanpa requirements yang harus dipasang terlebih dahulu? Caranya adalah jika dengan platform Windows lewat executable program yang berekstensi .exe atau .com. Bagaimana caranya? Seperti postingan yang lalu, dengan library pyinstaller pada Python. Jika pada postingan tersebut kita hanya mengkonversi menjadi exe saja, kali ini kita coba membuat aplikasi berbasis GUI.

Even though it’s a desktop application, it still requires installing Python within it. Now, how can we create a desktop application that runs without any pre-installation requirements? The approach is to use an executable program with the .exe or .com extension, specifically for the Windows platform. How can we do that? Just like the previous post, we can use the PyInstaller library in Python. While in the previous post, we only converted it into an exe file, this time we’ll try to create a GUI-based application.

A. Kivy

Salah satu library pada Python untuk membuat GUI yang baik adalah Kivy. Library ini walaupun dapat dikonversi menjadi mobile lewat library buldozer ternyata bermasalah ketika menjadikannya executable (.exe). Hal ini karena kompleksitasnya, ditambah lagi sejatinya memang untuk linux.

One of the libraries in Python for creating good GUIs is Kivy. Although this library can be converted for mobile use through the Buldozer library, it turns out to have issues when making it executable (.exe). This is due to its complexity, compounded by the fact that it is primarily designed for Linux.

B. TKinter

Nah, library lain yang dapat digunakan adalah TKinter. Library ini dapat membuat GUI untuk interface aplikasi Python. Walaupun kurang lengkap dibanding Kivy yang saat ini kian terkenal, TKinter memiliki kemampuan untuk dikonversi menjadi executable program.

Well, another library that can be used is Tkinter. This library allows you to create GUIs for Python applications. Although it may be less feature-rich compared to the increasingly popular Kivy, Tkinter has the ability to be converted into an executable program.

C. Pyinstaller

Ini merupakan library yang cukup baik untuk mengkonversi .py menjadi .exe. Saingan yang lain saya coba banyak gagalnya, misalnya py2exe, dan kawan-kawannya. Untuk menggunakannya instal terlebih dahulu:

This is a quite good library for converting .py files to .exe. Other competitors that I’ve tried had many failures, such as py2exe and its counterparts. To use it, you need to install it first:

pip install pyinstaller

Jika sudah siapkan aplikasi dengan TKinter, misalnya menjumlahkan secara sederhana dua angka. Untuk gampangnya silahkan tanya saja ChatGPT untuk samplenya.

If you have already prepared the application with Tkinter, for example, a simple addition of two numbers. To make it easier, feel free to ask ChatGPT for a sample.

Berikutnya kita tinggal mengetikan pada terminal di folder yang sama dengan kode python. Misal kode Python di atas diberi nama tesgui.py.

Next, you just need to type the following command in the terminal, assuming that the Python code is saved with the name “tesgui.py” in the same folder:

pyinstaller –onefile -w gui2.py

Tergantung besar atau kecilnya file py, pyinstaller akan mengkonversi menjadi exe. Hasilnya adalah sebuah file tesgui.exe yang terletak di folder dist.

The conversion of the .py file to an .exe file by PyInstaller depends on the size of the Python file. The result will be a tesgui.exe file located in the “dist” folder.

Jalankan saja file hasil kompilasi tersebut, tinggal dobel klik saja. Hasilnya akan muncul seperti berikut ini. Sederhana bukan? Silahkan coba model yang lebih kompleks, untuk tensorflow sepertinya perlu perlakuan khusus, karena sempat saya coba tidak muncul hasil eksekusi-nya, hanya GUI saja.

Just run the compiled file by double-clicking on it. The result will appear as follows. Simple, isn’t it? Feel free to try more complex models. For TensorFlow, it may require special treatment because when I tried it, the execution results didn’t appear, only the GUI.

Editing with ChatGPT

Salah satu kelemahan yang dimiliki kebanyakan peneliti berbasis pembuatan sistem, aplikasi, dan sejenisnya adalah membuat laporan yang lengkap. Hal ini dapat dimaklumi karena mereka sudah menghabiskan banyak waktu dalam merakit/mendevelop sistem. Biasanya ada asisten yang mensuport dalam pembuatan laporan, tapi jika tidak ada, salah satu andalan adalah ChatGPT. Alat berbasis AI ini tentu saja tidak boleh langsung digunakan untuk menulis otomatis, karena beberapa plagiarism check sudah bisa mendeteksinya. Postingan ini sedikit memberi informasi manfaat apa saja.

One of the common challenges faced by researchers involved in system development, application creation, and similar fields is the task of producing comprehensive reports. This can be understood considering the significant amount of time they have invested in building and developing the systems. While there are usually assistants available to support in report writing, if they are not accessible, one reliable option is to rely on ChatGPT. However, it is important to note that this AI-based tool should not be directly used for automatic writing, as plagiarism checks are capable of detecting such attempts. This post provides some information on the benefits it offers instead.

A. Translate

Saya sudah lama mengenal translate Google, bahkan di awal-awal, sudah pernah mencoba dan sempat heran ketika mentranslate “my name is jack” menjadi “nama saya dongkrak”. Namun saat ini sudah cukup baik, hanya saja terkadang istilah yang digunakan kurang tepat. Untuk ChatGPT tinggal menambahkan “translate ke inggris:<paste kalimat>” saja. Untuk translate berikutnyat terkadang tidak perlu menulis translate sudah langsung mentranslate.

I have known Google Translate for a long time, even in the early days, I have tried it and was surprised when it translated “my name is jack” to “nama saya dongkrak”. However, it has improved now, although sometimes the terms used are not quite accurate. For ChatGPT, you just need to add “translate to English: <paste sentence>”. Sometimes, for subsequent translations, you don’t need to write “translate” as it automatically translates the text.

Selain translate, bisa juga dengan menulis “revise: <paragraf>” untuk mengecek salah ketik, tenses, dan sejenisnya.

In addition to translation, you can also use “revise: <paragraph>” to check for typos, tenses, and similar errors.

B. Inserting Text

Selain malas menulis, terkadang software developer hanya menyajikan tabel, gambar, dan sejenisnya tanpa menambahkan informasi yang terkadang perlu diketahui oleh pembaca. Misalnya rentetan tabel atau gambar seperti berikut. Biasanya jurnal tidak menyukai style ini.

Apart from being lazy to write, sometimes software developers only present tables, images, and the like without adding information that readers may need to know. For example, a series of tables or images like the following. Usually, journals do not prefer this style.

Blok saja satu tabel di atas, lalu tulisakan “Buat satu kalimat tentang ini: <paste>” pada ChatGPT. Hasilnya adalah sedikit informasi tentang tabel yang dimaksud.

Block only one table above, then write “Create a sentence about this: <paste>” on ChatGPT. The result is a brief information about the mentioned table.

Jika terlalu ‘norak’, bisa dengan mengganti “Table 4, referred to as …” menjadi nama tabel saja. Sehingga dihasilkan bentuk seperti ini.

If it’s too ‘tacky’, you can change “Table 4, referred to as …” to just table name. So it will result in a format like this.

Masih banyak fasilitas-fasilitas lain yang diberikan ChatGPT. Tentu saja, namanya tool, sebaiknya hanya sebagai alat bantu saja. Terima kasih.

There are still many other features provided by ChatGPT. Of course, as its name suggests, it’s best to use it only as a tool. Thank you.

Buldozer for developing Python applications on Android

Mobile applications saat ini merupakan aplikasi yang paling banyak dipakai. Sebagai contoh, hampir jarang pengguna Facebook dengan browser. Mulai dari taxi online, hingga pembarayan menggunakan handphone. Kemudahan karena bentuk yang mudah dibawa menuntuk aplikasi-aplikasi (desktop dan website) disiapkan juga versi mobile-nya. Postingan kali ini hanya mengilustrasikan bagaimana mengkonversi aplikasi berbasis python yang kita buat menjadi aplikasi mobile, salah satu yang terkenal adalah berbasis Android.

Mobile applications are currently the most widely used applications. For example, it is rare to find Facebook users accessing it through a browser. From online taxis to mobile payments, smartphones have made it convenient to access various applications. As a result, many applications (both desktop and website-based) have prepared mobile versions. This post will illustrate how to convert a Python-based application into a mobile application, specifically focusing on the popular Android platform.

A. Kivy

Salah satu library python yang banyak digunakan untuk membuat aplikasi Python agar bisa berjalan di mobile app adalah Kivy, lihat post terdahulu untuk lengkapnya. Masih menggunakan aplikasi pada post sebelumnya sebagai ilustrasi. Berikut tampilan GUI dengan Kivy setelah dirunningl.

One of the widely used Python libraries for creating Python applications that can run on mobile apps is Kivy, as mentioned in the previous post. Continuing with the application from the previous post as an illustration, here is the GUI appearance with Kivy after running it.

B. Buldozer

Buldozer merupakan satu paket berbasis Python untuk membuat apk dari bahasa Python yang dibuat dengan library kivy. Kira-kira tampilannya sebagai berikut. Silahkan lihat di google colab ini. Uniknya, buldozer dapat dijalankan lewat Google Colab, sehingga hanya membutuhkan browser saja. Metode lainnya lihat postingan ini.

Bulldozer is a Python-based package for creating APK files from Python code built with the Kivy library. Here is an example of its appearance. Please refer to this Google Colab link for more details. The unique feature of Bulldozer is that it can be executed through Google Colab, requiring only a web browser. For alternative methods, please refer to this post.

C. File Buldozer.spec

Perhatikan setiap instalasi pada cell di colab jangan sampai ada error (berwarna merah). Ketika inisialisasi, buldozer.spec muncul dan siap dijalankan, juga dengan Google Colab. Ganti nama aplikasi, tampilan splash dan icon. Untuk requirements di baris ke 40 tambahkan library-library yang digunakan, beserta versinya, misalnya kivy==2.2.0. Library lain tambahkan jika ada di impor pada header python, misal pillow, tensorflow, dll.

Please ensure that there are no errors (in red color) during the installation process in each cell in Colab. When initializing, the bulldozer.spec file will appear and is ready to be executed, even in Google Colab. You can rename the application, customize the splash screen, and change the icon. In line 40, add the required libraries along with their versions to the requirements, for example, kivy==2.2.0. If there are any additional libraries imported in the Python header, such as Pillow, TensorFlow, etc., please include them as well.

Jangan lupa menghilangkan hastag # jika akan digunakan. Please remember to remove the ‘#’ symbol if you intend to use the code.

D. Menjalankan (running) File Apk

Nah, repotnya adalah proses kompilasi yang hampir setengah jam. Jika sudah tinggal dipindah apk yang dihasilkan untuk diinstal di handphone. Lokasi apk ada di folder bin. Pastikan Android paket sudah selesai terbentuk di bagian akhir google colab.

Well, the inconvenience lies in the compilation process which takes nearly half an hour. Once it’s done, you just need to transfer the generated APK file to your mobile device for installation. The APK file can be found in the ‘bin’ folder. Make sure that the Android package has been successfully created towards the end of Google Colab.

Tampilannya kira-kira seperti ini, mirip dengan versi Kivy python.

The appearance would be something like this, similar to the Kivy Python version.

Sekian, video youtube dapat dilihat di link berikut, terima kasih.

That’s all, the YouTube video can be viewed at the following link. Thank you.

Kivy, a Python-based Object-oriented Application Interface

Perkembangan teknologi software development saat ini sangat pesat. Ditambah lagi saat ini ada ChatGPT yang cukup membantu. Dengan kata kunci “buatkan kode python untuk menjumlahkan dua angka dengan interface menggunakan kivy agar bisa jalan di android” responnya cukup baik, yaitu berupa source code yang diinginkan.

The current software development technology is advancing rapidly, and with the availability of helpful tools like ChatGPT, the process becomes even smoother. By providing the keywords “create Python code to add two numbers with an interface using Kivy to run on Android,” a satisfactory response is generated in the form of the desired source code.

Berikutnya kita coba jalankan kode tersebut dengan Visual Studio Code. Oiya, install terlebih dahulu library kivy.

Next, let’s try running the code using Visual Studio Code. Oh, and don’t forget to install the Kivy library beforehand.

pip install kivy

Problem di atas hanya ilustrasi saja (penjumlahan dua inputan). Untuk yang lebih kompleks dapat menggunakan cara tersebut, yang penting mengetahui teknik input, memproses dan mengeluarkan outputnya.

The problem above is just an illustration (summing two inputs). For more complex tasks, you can use the same approach, as long as you understand the techniques for handling input, processing it, and producing the desired output.

Jalankan kode tersebut dengan masuk ke Run – Run Without Debugging. Atau jika menggunakan editor lain, masuk ke command window dilanjutkan mengetik:

To run the code, follow these steps: Open your preferred editor (e.g., Visual Studio Code), navigate to the “Run” menu and select “Run Without Debugging”. This will execute the code. If using a different editor, access the command window and type the following command:

python penjumlahan.py

Perhatikan, sebuh GUI muncul dengan input dan output yang bisa dikonversi lebih lanjut menjadi aplikasi mobil lewat library buldozer.

Note that a GUI will appear with input and output, which can be further converted into a mobile application using the Kivy library’s “Buildozer”.

Convert Python file to Exe File

Mahasiswa jaman dulu sudah mengenal kompilasi program menjadi file executable. File jenis ini tidak bisa langsung dilihat kode programnya, sehingga lebih aman dari ‘penggunaan kembali’ oleh orang lain. Postingan ini khusus untuk pengguna windows, platform yang bisa menjalankan langsung dile EXE.

Pertama-tama siapkan dahulu file python yang akan dikonversi dilanjutkan dengan menuju ke lokasi foldernya. Klik kanan dan pilih Open in Terminal. Atau bisa masuk langsung ke Command lalu arahkan ke folder aplikasi.

In the past, students were already familiar with compiling programs into executable files. This type of file cannot be directly viewed as source code, making it safer from being reused by others. This post is specifically for Windows users, a platform that can directly run EXE files.

First, prepare the Python file that will be converted, then navigate to its folder location. Right-click and select “Open in Terminal.” Alternatively, you can directly go to the Command Prompt and navigate to the application folder.

A. Install Pyinstaller

Setelah masuk ke command prompt, install library untuk konversi ke executable, yakni pyinstaller. Ketik kode:

After entering the Command Prompt, install the library for converting to an executable, which is pyinstaller. Type the following code:

pip install pyinstaller

B. Run Pyinstaller

Setelah pyinstaller terinstall, jalankan untuk mengkonversi file py menjadi exe. Ketikan instruksi:

After pyinstaller is installed, run it to convert the .py file to .exe. Type the following command:

pyinstaller –onefile -w process.py

Proses kompilasi berjalan dengan lama tergantung kompleksitasnya. Untuk program contoh, cukup lama prosesnya (sepeminuman the). Setelah selesai, pada folder dist tampak process.exe sudah terbentuk. Selanjutnya saya pindahkan ke folder tempat akan dieksekusi. Ukurannya fantastis, 500-an Mb, dibanding dengan sebelumnya yang 1 Kb. Mungkin akibat memasukan library-library yang digunakan. Salah satunya adalah tensorflow.

The compilation process takes time depending on its complexity. For the example program, it took quite a while (around a few minutes). Once it’s done, you will see that the process.exe file is created in the “dist” folder. Next, you can move it to the folder where you want to execute it. The size of the executable file is significantly larger, around several hundred megabytes, compared to the original file size of 1 KB. This increase in size is likely due to the inclusion of the libraries used in the program. One of them is TensorFlow.

C. Cek Hasil Konversi

Berikutnya kita uji dengan menjalankan file EXE. Kebetulan di sini file exe akan diakses oleh file PHP (maaf, rumit ya). Sebelumnya diakses dengan kode pada process.php sebagai berikut:

Next, we will test the executable file by running the EXE file. In this case, the EXE file will be accessed by a PHP file (apologies for the complexity). Before accessing it, use the following code in process.php:

Kemudian di sini process.py akan kita ganti dengan process.exe yang baru saja kita konversi. Ganti menjadi sebagai berikut.

Then, here we will replace process.py with the newly converted process.exe. Change it as follows:

Untuk memastikan bukan file process.py yang dipakai, ganti saja (rename), misalnya xprocess.py. Setelah itu jalankan file phpnya dengan kode:

To ensure that the file being used is not process.py, simply rename it, for example, to xprocess.py. After that, run the PHP file with the following code:

php -S localhost:8000

Atau gunakan cara biasa dengan XAMPP setelah memindahkan file aplikasi ke htdocs (lihat pos yang lalu).

Alternatively, you can use the conventional method with XAMPP after moving the application files to the htdocs directory (as mentioned in the previous post).

Dengan memasukan 4 input, file html tersebut menjalankan file process.php yang menangkap inputan, selanjutnya mengakses file process.exe yang sebelumnya python. Jadi, jika ingin kode rahasia Anda tidak bisa dibuka karena file .py maka dengan .exe akan lebih aman. Lebih jelasnya lihat video youtube berikut:

By entering 4 inputs, the HTML file executes the process.php file, which captures the inputs and then accesses the previously Python file, process.exe. So, if you want to protect your secret code from being easily accessed, using .exe files instead of .py files will provide more security. For more clarity, please refer to the following YouTube video: