Menutup Akses Flashdisk

Sumber datangnya virus untuk perkantoran biasanya berasal dari flash disk, selain kekhawatiran terhadap tercurinya data rahasia. Beberapa institusi seperti bank, data center, dan sebagainya kebanyakan dilarang menggunakan flashdisk. Tugas Anda adalah menutup akses flashdisk suatu PC yang berbasis windows.

  • Start – RUN. Ketik ‘regedit
  • Sebelumnya ada baiknya kita melakukan backup terhadap registri.

  • Klik: File – Export: untuk gampangnya letakkan di desktop. Beri nama, misal: “usb_on”
  • Maka kita telah menyimpan registry default dari komputer tersebut.
  • Buka (bongkar) HKEY_LOCAL_MACHINE – SYSTEM – CurrentControlSet – Services – USBSTOR

(NOTE: Walaupun kita dapat mengganti nilai Start dengan harga tertentu agar flashdisk OFF, tetapi cara tersebut masih bisa ditembus. Cara yang kuat adalah dengan men-delete USBSTOR)

  • Klik kanan pada USBSTOR – Delete.
  • Coba masukkan flashdisk, pastikan tidak terbaca.

Untuk mengembalikan, dobel klik pada usb_on.reg hasil backup registry.

Cloud Computing untuk Office

Masalah lisensi merupakan momok yang dapat mengganggu kinerja suatu institusi. Bila melanggar, harus siap menghadapi jeratan hukum. Oleh karena itu guna menghindari hal tersebut ada baiknya mencari aplikasi yang berbasis open source atau teknologi baru seperti cloud computing yang banyak dijumpai di internet. Salah satunya adalah www.docs.google.com untuk documents, presentations, sheet, drawing dan forms.

Hanya dengan bermodal browser yang gratis, kita dapat membuat dokumen seperti microsoft word, spreadsheet seperti excel dan sebagainya, dengan syarat, browser yang terinstal harus yang support, misalnya google chrome atau browser lain yang update. Selamat mencoba.

Windows 2000 Firewalling

 Karena situs aslinya malah sudah tutup, saya share lagi, sayang ilmunya:

Windows 2000 as well as Windows XP Professional both allow the end user to construct a IPSec Firewall without having to rely on canned or “for purchase” third-party solutions. I myself am amazed when paging through industry journals that spend most of their time painting most Firewall systems as half-baked because those systems only prevent ingress packets and not egress packets. I must admit that after witnessing Windows XP’s sorry excuse for Firewalling (this indeed is half-baked), I was heartened to see that Microsoft left the IPSec functionality alone while upgrading Windows. The only sin Microsoft is guilty of in this regard is burying the IPSec system so very deep in the system, where in Windows 2000 it’s nearly at the surface. Windows 9x is completely helpless in this regard and Linux uses a different system altogether so this is primarily going to just concentrate on Windows IPSEC Firewall security.

IPSec Firewalling begins at a blank MMC console:


From here, we will click these items in order:

  1. Console
  2. Add/Remove Snap-in
  3. Add
  4. Select “IP Security Policy Management”
  5. Add
  6. Finish
  7. Close
  8. Ok

To get to our starting screen:


Alternately, there is a faster way within Windows XP (maybe also 2000) and that is: Start, Run, secpol.msc. Thanks for the comments, sorry that the MMC intro is a little labyrinthine, Win2k (when I wrote this page initially) didn’t have a lot in the way of guides.

Windows 2000 initially ships with all these nifty MMC extensions and snap-ins to make your life easier, and it’s one of the most overlooked “cool features” that Microsoft never really hyped enough when they initially released Windows 2000. IPSec lacks some defaults, but this lack of attention on Microsofts part is easily patched over. IPSec lacks the ability to block any ports, even though blocking is something that you can eventually establish for rules and such, I’ve found adding to the IPSec Filter Actions an entry called “Block” makes life much easier later on. To establish a “Block” Filter Action, follow these steps:

  1. Click on the “plus symbol” next to “IP Security Policies…” under the Console Root folder in the left-hand pane
  2. Right-click on “IP Security Policies…” in the left-hand pane
  3. Click “Manage IP Filter Lists and Filter Actions”
  4. Click on the tab “Manage Filter Actions”
  5. Click Add
  6. Click Next
  7. Set Name field to “Block” and set the description to “Block Access”
  8. Click Next
  9. Click the radio-button next to “Block” in the “Filter Action” dialog box
  10. Click Next
  11. Click Finish

This will be how it looks when you are done with establishing a Blocking rule:


Microsoft has never explained why they included “Permit”, “Request Security (Optional)”, and “Require Security” in this by default but never even gave a thought to including “Block” when it seems to be an obvious default to include, but, that’s Redmond Logic for ya. In the beginning we start with this screen:

The firewall we will design will be a member in the right-hand pane of this window, and because I couldn’t think of anything better to call it, I refer to it as “Firewall”. I don’t change any of the other entries and it’s good advice to follow when I say ignore anything about Kerberos. Mostly because I’ve yet to see anyone seriously use it and frankly I think Microsoft has done naughty things making their little private extensions to the Kerberos standard, oh well, they don’t call it the Beast of Redmond for nothing.

Moving on…

We start our firewall off by these steps:

  1. Right-clicking on the “IP Security Policies on…” item in the left-hand pane
  2. Click on “Create IP Security Policy”
  3. Click Next
  4. In the Name field, type in “Firewall”, and in Description type in “Firewall”
  5. Click Next
  6. Click Next (the default will do fine)
  7. Click Next (the default will do fine)
  8. If you are not part of a domain, like me, a Warning will pop up, ignore it, if it doesn’t, then ignore this line. Click Yes if you get it.
  9. Click Finish

This screen is now were we concentrate our activities, you’ll have to uncheck “Use Add Wizard” because I found it tacky and slow, and you might too! Anyhow, the screenshot:

For my firewall I ignore the <Dynamic> rule.

I’ve defined several rules that I found very useful and I’ll detail them all below, following some examples I set here to show how to insert them and make them work for you.

First lets create a basic rule that denies all TCP/IP traffic and all ICMP traffic. We build the firewall with the idea of a leperous network, as many protocols that we can turn off the better, and blocking protocol types is the best place to start because at least in the case of TCP/IP it terminates egress and ingress on ALL PORTS from 0 to 65,535. To achieve this follow these steps below:


  1. Click Add
  2. Two Filter Lists come predefined, All IP Traffic and All ICMP Traffic
  3. Click the round circle to the left of “All IP Traffic” and then click on the tab named “Filter Action” and click the circle to the left of “Blocked”
  4. Click OK.
  5. Click Add
  6. Click on the tab named “IP Filter List”
  7. Click the round circle to the left of “All ICMP Traffic” and then click on the tab named “Filter Action” and click the circle to the left of “Blocked”
  8. Click on the tab named “IP Filter List”
  9. Click OK.

These steps effectively block all IP and ICMP traffic from both egress and ingress to your system once the “Firewall” package has been assigned. At this point in the game, your computer is almost as good as unconnected to the network, no port scanning on your IP address will reveal any ports open and as an added bonus, since you’ve also cut off ICMP traffic as well, all port scanning to your IP Address will behave as if it is a TCP/IP black hole, packets get sent out but they never get accepted or refused right out, so the scanner will have to wait for timeouts to pass for each scanned port, that seriously slows any scanning program right down, good for you and the WH, bad for the BH.

However, in this state it does suck for the user. Since no traffic can enter or leave based on IP or ICMP protocols it’s just as if we had unplugged the poor person from the network. This basic firewall is a great way to deny a user a path to the Internet while still allowing them the benefit of knowing the Ehternet cable is plugged into their NIC. At this point we have to start poking holes in our firewall to let the ports we know pass through in the ways we wish.

The general form that I follow depends on what filter definition you use, these shots coming up will show how to limit a popular port, like 80/tcp by ingress, or egress, or just from a particular subnet. Then at the end I’ll discuss what ports I do let through and why.

To Allow Port 80/tcp ingress (Opening your Webserver)

Starting from the top:


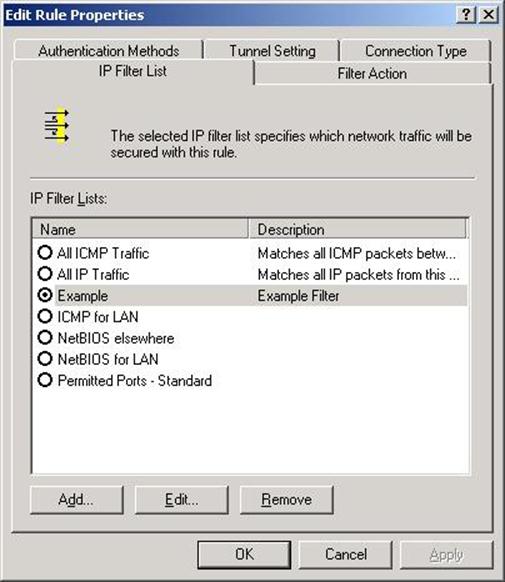
I’ve already created an “Example Firewall” and stocked it with all the options in order to achieve the objective, wihch is to provide 80/tcp ingress. The definition on the “Example Firewall” on the left, and when you double-click on “Example”, you see the screen on the right:

So far, we have a IP Filter List that we’ve selected, and also allowed for it’s traffic to pass by selecting Permit in the “Filter Action” screen. Next we will go back to the IP Filter List called “Example” and show in a series of shots how to create a hole in our firewall (covered above) so that the HTTP port, 80/tcp is allowed open and given the rights for ingress, so that a webserver on our machine can be seen on the general internet. Note that this example doesn’t make use of the subnet rules to define sections of network as friendly or unfriendly. Examples follow…


Essentially that is all there is to it, beyond being particular about subnetting and deciding ports and protocols the rest of the firewalling is up to you, the administrator. If you prepare a system like I have then you eventually find yourself developing a firewall that protects people while still allowing them to use the services they have come to depend on without risking ingress or egress on any other port that might eventually become useful to a BH agent. I simply leave ICMP totally alone except for opening it up to the local LAN, this provides ICMP messages (ping and tracer) information to flow across my LAN with ease but prevents any other ICMP packets from actually being processed by any of the Windows 2000 systems on my LAN. More of course, is coming up as I describe the ports and the why’s behind my selections.

Firewall Port Selection

Previously I stated that having the basic no-traffic-allowed firewall was the simplest to implement, it was also the most impossible to use. Because no packets can egress or ingress at all, no services that use network components ultimately fail. Items such as Netscape Navigator, Internet Explorer, DNS, NetBIOS, and even the Novell Client32 cannot work properly under these conditions. I faced this exact question when I first started working on this firewalling project. Initially I wanted only to provide firewall holes for services I knew about and I knew my users would absolutely need for core business processes. Because Windows 2000 IPSec firewalling prevents egress as well as ingress, I realized an unforseen benefit from employing these firewalls, unauthorized software that is internet enabled and uses unique TCP/IP ports are rendered useless without the user requesting help, and with slightly educated users, help with turning on ports, which leads to questions and a very useful way to protect people from their own shortsightedness. Anyhow, on with the Parade of Ports:

Service Name

Port Numbers Used

Notes/Comments

Ingress/Egress

HTTP

80/tcp


Egress

DNS

53/tcp & 53/udp

Only Allowed for 192.168.0.0

Egress

Wins (TCP)

42/tcp & 42/udp


Egress

NNTP

119/tcp


Egress

Network Time Protocol

123/udp


Egress

Groupwise (IMAP)

143/tcp

Only Allowed to IMAP server alone

Egress

Server Location (TCP)

427/tcp & 427/udp


Egress

SSL (TCP)

443/tcp


Egress

Hi-Wins

1512/tcp & 1512/udp


Egress

Groupwise

1677/tcp

Only allowed for 192.168.0.0

Egress

NetMeeting Gate Discovery

1718/tcp & 1718/udp


Egress

NetMeeting Gate Stats

1719/tcp & 1719/udp


Egress

NetMeeting Host Call

1720/tcp & 1720/udp


Egress

NetMeeting Connector

1503/tcp & 1503/udp


Egress

NetMeeting MSICCP

1731/tcp & 1731/udp


Egress

VNC

5800/tcp & 5801/tcp


Egress

VNC

5900/tcp & 5901/tcp


Egress

NetMeeting IN

1503/tcp & 1503/udp


Ingress

NetMeeting IN

1718/tcp & 1718/udp


Ingress

NetMeeting IN

1719/tcp & 1719/udp


Ingress

NetMeeting IN

1720/tcp & 1720/udp


Ingress

NetMeeting IN

1731/tcp & 1731/udp


Ingress

FTP

21/tcp


Egress

FTP Datastream

20/tcp


Egress

Netware

213/tcp


Egress

Netware

396/tcp


Egress

Netware

524/tcp


Egress

Real Time Streaming Proto

554/tcp


Egress

RealPlayer

7070/tcp


Egress

RealPlayer

6970/udp


Egress

Novell Portal

8008/tcp


Egress

Novell Portal

8009/tcp


Egress

Defrag

3090/tcp


Egress

Defrag

139/tcp


Egress

Defrag

445/tcp


Egress

Telnet

23/tcp


Egress

Wins

135/tcp

Only allowed for 192.168.1.0 & 192.168.2.0

Ingress

NetBIOS-NS

137/udp

Only allowed for 192.168.1.0 & 192.168.2.0

Ingress

NetBIOS-DGM

138/udp

Only allowed for 192.168.1.0 & 192.168.2.0

Ingress

NetBIOS-SSN

139/tcp

Only allowed for 192.168.1.0 & 192.168.2.0

Ingress

SMB over TCP

445/tcp

Only allowed for 192.168.1.0 & 192.168.2.0

Ingress

ICMP Ports for LAN

all/icmp

Only allowed for 192.168.1.0 & 192.168.2.0

Ingress

All other TCP/IP and ICMP ports are left closed, and all NetBIOS ports (nee, read SMB) are specifically closed to all network locations except for 192.168.1.0 and 192.168.2.0 class subnets. I spend extra time defining SMB protections because after analyzing the Windows 2000 logs I detected an inordinate amount of browsing going on thru Network Neighborhood in relationship to a popular subnetwork of ours called ResNet. While I cannot estimate how many of these browsers were bent for some BH purpose, my task was very clear, block everyone except those that must have SMB abilities from engaging in any activities related to SMB. The most sensitive ingress points are likewise protected by the extra definition of the subnet filter, no machine on our LAN outside of our two common subnets may engage these ingress points. The proof comes in the logs, the amount of detected browsing has sharply fallen off and those that do are local users for which I have implicit trust. The only technically unprotected ingress points are those surrounding NetMeeting, however Microsoft provides certificate and username/password controls on NetMeeting so I am not as greatly concerned about protecting those ingress points with so many rules – that and I prefer to leave those particular ingress points free so that I may have the convenience of connecting from remote locations off of our 192.168.0.0 home network.

Download Example Firewall IPSEC file here. (Hint: Use “Save Link As…” or “Save Target As…” to download this file) 

Download Basic Example Firewall IPSEC file here.

How to Install *.IPSEC files:

The file isn’t meant for MMC console, instead it’s meant for the IP Security Policy snap-in. Follow these steps:

  1. Open MMC
  2. Click on File
  3. Click on Add/Remove Snap-In, add the IP Security Policy snap-in, click ok.
  4. When back to the MMC console, click the plus to the left of “IP Security Policies on Local Computer” in the left-hand pane, then click on “IP Security Policies on Local Computer” itself, in the left-hand pane.
  5. Right click on the IP Security Policy icon and click “All Tasks” then click on “Import Policies”, then find the firewall.ipsec file and click ok.

Updated: 6/15/2007


Asyiknya Sidang Tugas Akhir

Selain mengajar dan meneliti, ternyata ada satu lagi aktivitas yang mengasyikkan sebagai dosen, yaitu menyidang tugas akhir / skripsi mahasiswa. Walau terkadang didapati mahasiswa yang kurang serius, ternyata banyak juga yang serius dan kreatif, terutama saat mengatasi permasalahan-permasalahan yang dihadapi. Periode yang lalu merupakan periode sidang tugas akhir/skripsi yang menurut saya menarik terutama saat peragaan alat robot. Permasalahan yang muncul ternyata bukan hanya masalah teknis saja, keuangan juga harus menjadi bahan pertimbangan.


Robot tampak bergerak timpang karena kurangnya motor penggerak kaki, sehingga mahasiswa menggunakan rangkaian penyambung antara kaki depan dengan belakangnya. Terlepas dari itu, ketekunannya menyelesaikan tugas akhir D3 patut diacungi jempol. Selamat.

Security vs Educating User

Security is main concern for microsoft coorporation. Since windows Xp sp 2, it included firewalls on its product, even though in sp 1 windows had used firewalls even must be set manually. After launch windows 7, microsoft introduce anti virus which have a life time lisence. But microsoft sometimes could not educate user well, for example in windows 7 there is suggestion when entering the hot spot area to push the button on the router. Can you imagine if your staff do this at your office?

Metodologi dalam Pembuatan Perangkat Lunak

Seperti halnya perancangan produk di industri, merancang produk perangkat lunak juga memerlukan metodologi agar produk yang dihasilkan berkualitas baik. Karena karakteristiknya yang unik (tidak bisa aus, cepat berkembang, dll) software memiliki metodologi beragam yang telah dilakukan oleh pengembang-pengembang perangkat lunak.

Dalam bukunya, Roger S presman membagi metodologi menjadi bermacam-macam (waterfall, incremen, spiral, prototype, dll). Namun, pendekatan yang disarankan oleh Martin Fowler dalam bukunya UML Distilled cukup menarik, yakni hanya membagi metodologi menjadi waterfall dan iterasi. Sedangkan yang lainnya seperti spiral, incremen, dimasukan dalam kategori iterasi. Berikut penjelasan singkatnya.

Metodologi waterfall, sesuai dengan namanya “air terjun” merupakan metode klasik yang telah digunakan oleh analis dan disain perangkat lunak. Metode ini membagi proses pembuatan perangkat lunak dalam fase-fase seperti analisa, disain, coding, testing dan implementasi dengan urutan yang jelas. Karena memiliki kelemahan yang cukup signifikan, metode Iterasi membagi proses pembuatan perangkat lunak menjadi tahapan-tahapan yang tiap tahapan terdiri dari fase-fase yang ada pada waterfall ( analisa, disain, coding, testing dan implementasi). Sehingga kemungkinan kegagalan dalam  proses pembuatan software dapat ditekan sekecil mungkin. Tahapan tersebut disusun mulai dari kebutuhan software terkecil hingga lengkap, namun tentu saja membagi menjadi tahap-tahap bukan merupakan pekerjaan yang mudah.

Sedangka dalam hal perancangan, Martin Fowler dalam buku yang sama juga menjelaskan bahwa ada dua jenis perancangan, yaitu prediktif dan adaptif. Perencanaan prediktif mengharuskan vendor pembuat perangkat lunak mampu memprediksi baik dari sisi kebutuhan software maupun hal-hal lain. Sedangkan perencanaan adaptif vendor pembuat tidak memiliki prediksi yang jelas, sehingga kebutuhan sofware selama proses pembuatan perangkat lunak bisa saja berubah (beradaptasi) mengikuti kebutuhan konsumen yang fleksibel. Oleh karena itu Martin Fowler menyarankan dalam merancang suatu sofware kita memanfaatkan tools system sebaiknya dari yang sederhana kemudian kita tambah sesuai kebutuhan dari pada memanfaatkan tools system yang kompleks dan kemudian satu persatu kita hilangkan mengikuti kebutuhan.

Namun kebanyakan kampus-kampus menggunakan metodologi yang ada di buku-buku teks klasik (Roger S Pressman dan Ian Sommerville) walaupun saat ini sudah mulai muncul metode-metode baru yang menyesuaikan dengan kebutuhan/karakter software yang dirancang seperti Agile dan Extreme Programming (XP). Menilik dari pengalaman-pengalaman yang lalu dalam membuat bahasa standar object programming UML yang banyak memakan waktu dan dana, ada baiknya para metodis (pakar di bidang metodologi) agar sedikit longgar dan mengikuti tren pasar. Bahkan sering disindir, “bedanya metodis dengan teroris hanya satu, yaitu kita bisa bernogosiasi dengan teroris”. 🙂


Menambah Aplikasi Chatting pada Blog

Salah satu kelemahan blog adalah interaksi antara penulis dan pembaca tidak secara langsung. Alangkah baiknya saat pembaca membaca tulisan kita, kita persilahkan dia untuk berinteraksi langsung secara online lewat aplikasi yang disediakan oleh Widget vendor blog, seperti meebo (www.meebo.com). Tambahkan widget meebo pada tampilan blog Anda dan jika Anda online (login) maka pembaca bisa menyapa anda langsung.


Sayangnya Yahoo belum menyediakan widgetnya ke wordpress. Jika yahoo juga sudah tersedia kabarin saya ya?

Komputer II: Membuat Database di Access 2007

Untuk materi UAS khusus jurusan Akuntansi, coba pelajari tulisan berikut ini.

A. MEMBUAT DATABASE PEMBELIAN

Buka Microsoft Access 2007, kemudian pilih “Blank Database”.

Pilih lokasi database di D:\ kemudian klik “Create”. Maka kita sudah masuk ke Database yang akan dirancang.

Klik kanan pada Table 1: Table dan pilih “Design View”. Beri nama tabel pertama “Barang”. Klik “Ok”.

Selanjutnya kita diminta memasukkan tiga Field pada tabel barang tersebut. Buat Field-fieldnya misalnya: Kode_brg, Nama_brg, Harga_brg.

Perhatikan, di sini ada simbol “Primary Key” yang berarti tidak boleh ada dua record yang memiliki data yang sama pada primary key-nya. Buat tabel baru untuk Suplier dan Pembelian.

Gunakan Cara yang sama untuk tabel Suplier dan Pembelian. Sehingga dihasilkan pada microsoft Access sbb.

Buat relasi antara tiga tabel tersebut dengan mengklik “Database Tool” dan “Relationship”.

Relasikan ketiga tabel tersebut (jangan lupa sebelumnya tabel disimpan terlebih dahulu). Tambahkan field-field yang berfungsi sebagai kunci tamu (Foreign Key), pada tabel barang Kode_sup dan pada tabel Pembelian Kode_brg dan Kode_sup.

Pilih dengan Add (klik ganda) pada Barang, Pembelian dan Suppler. Untuk membuat relasi drag Primary Key ke Kunci tamu pada tabel lain.

Sesaat setelah melakukan drug dari Primary Key ke Kunci tamu di tabel lain, akan muncul jendela konfirmasi, klik Create.

B. MEMBUAT FORM

Buat Form yang menampilkan “Barang”, “Pembelian” dan “Suplier” dengan cara mengklik “Create” dan”Form” di tabel barang.

Sehingga dihasilkan form untuk tiap tabel. Selamat Mencoba.

Membuat Automatic Table of Contents

Langkah pertama adalah memisahkan antara kata pengantar dan daftar isi dari halaman isi (bab 1 sampai penutup). Arahkan mouse di bawah daftar isi / di atas bab I. Klik Page
Layout > Breaks > Next Page.

Berikutnya membuat halaman, klik Insert > Page Number > Pilih Posisi Bawah Kanan. Maka akan muncul halaman di bawah sebelah kanan di tiap halaman.

Karena daftar isi dengan Bab I berbeda penomoran halamannya, maka kita harus merubah halaman kata pengantar dan Daftar Isi dengan format: i, ii, iii, dan seterusnya. Dobel klik halaman di kata pengantar hingga muncul tampilan header dan footer. Pilih Page Number > Format Page Number > Pilih format i, ii, iii, … Kemudian tekan OK.

Maka kata pengantar dan Daftar Isi halamannya akan berubah menjadi i, ii, iii sedangkan Bab I tetap halaman 3. Jika tidak berarti Anda belum menjalankan langkah pertama (Page layout > Breaks > Next Page). Berikutnya kita akan memisahkan format Footer antara Bab I dengan Kata Pengantar dan Daftar Isi. Dobel klik pada Halaman 3, klik Ling to previous untuk menonaktifkan agar terpisah dengan halaman sebelumnya.

Berikutnya ganti halaman 3 menjadi halaman 1 dengan format page number. Pilih start at 1. Karena format i,ii, … harus dibawah “Tengah”, ubah formatnya menjadi di tengah. Halaman 1 harusnya tetap, tidak berubah.

Berikutnya adalah kita akan membuat daftar isi otomatis (Automatic Table of Contents). Daftar isi otomatis berlaku jika tiap bab yang akan muncul di daftar isi nanti, berformat Heading dan muncul pada Navigasi. Klik View > Centang Document Map.

Tiap bab yang akan dimunculkan pada daftar isi, harus muncul pada Document Map. Jika pada Document Map ada isinya, kita hilangkan terlebih dahulu dengan blok seluruh naskah (Ctrl – A) kemudian pilih Home > Normal.

Coba arahkan mouse ke halaman 1. Blok Bab I pilih Heading, sehingga muncul bab I pada document map

Kemudian klik symbol kuas (Format Painter) dilanjutkan dengan blok PENDAHULUAN agar mengikuti format BAB I. Lakukan dengan cara yang sama Pada tiap Awal BAB. Atau untuk mempercepat, kita dapat mengklik Ctrl – Shift – C dan menekan Ctrl – Shift – V pada kalimat/kata di awal bab II, III dan seterusnya. Lakukan Cara yang sama untuk Sub-bab, hanya saja pada subbab perlu ditambahkan

Jika sudah, kita tinggal mengkopi saja “Latar belakang Masalah” tersebut ke Sub-Bab lainnya. Coba untuk yang Sub-Bab 1.2.

Lakukan semua Sub-Bab dari Bab I sampai Bab V Kesimpulan dan saran. Perhatikan seluruh Document Map harus sudah terisi lengkap karena Daftar Isi Otomatis akan mengambil dari Document Map. Berikutnya adalah membuat Daftar Isi Otomatis.

Arahkan mouse / kursor pada Daftar Isi (Di atas Bab I). klik References > Table of Contents > pilih Format Automatic Table 1 atau 2.

Maka Daftar Isi akan muncul secara otomatis. Anda tinggal merubah Table of Contents menjadi Daftar Isi atau menambahkan halaman kata pengantar dan daftar isi ke dalamnya.

Kemudian atur agar rapi, karena awal bab harus di halaman baru, gunakan Insert > Page Break.

Karena ada perubahan halaman, maka Dafter Isi harus diupdate, Sorot Table of Contents, klik Update Table, dan pilih halamannya saja atau seluruh bagian Daftar Isi berubah.

Selamat mencoba, semoga bermanfaat saat skripsi/tugas akhir.

Jawaban Tugas Komputer II

Berikut penjelasan dari materi sebelumnya. Setelah mendownload file rth3, coba buka dengan Microsoft excel 2007. Coba isi kolom berwarna dengan cara berikut ini:


Kolom NAMA, nilai, IPK dan Dosen Wali berasal dari sheet DATA. Sedangkan max sks yang bias diambil menggunakan logika dengan rincian sebagai berikut:

IP > max mengambil 24 sks, IP 2.5 – 3 max mengambil 21 sks, ip 2– 2.5 max mengambil 18 sks, ip 1.5 – 2 max mengambil 15 sks dan dibawah 1.5 max mengambil 12 sks.

Pertama-tama kita harus membuat variable dari table, caranya pada sheet DATA, blok seluruh isian, kemudian beri nama “data” di atasnya, perhatikan gambar di bawah ini.


Selanjutnya variable “tabel” ini akan digunakan untuk operasi “Vlookup” yang akan diisi pada sheet KHS berikut ini. Kembali ke Sheet KHS, arahkan mouse pada cell nama untuk mengisikan nama secara otomatis berdasarkan NPM yang dipilih.

Perhatikan !! Ada dua notasi pecahan di dunia, yaitu dengan koma dan titik. Jika komputer Anda menggunakan koma sebagai pecahan, maka seluruh instruksi harus mengganti koma dengan “titik koma“. Standar itu dapat Anda ganti dengan mengklik – Excel Option – Advance.


Buang centang pada “use system separators” kemudian ganti decimal separator dengan thousands separator sesuai dengan standar yang dipakai. Jika sudah klik “Ok”.


Berikut penjelasan “Vlookup”. Disini b5 merupakan cel dari NPM yang menjadi patokan nama. Oleh karena itu ketik b5 setelah kurung buka. Setelah diketik ” ,” selanjutnya Excel akan meminta rangkaian table yang dijadikan arah “Vlookup”. Karena kita telah membuat variable bernama “tabel” yang merupakan arahan “vlookup” tersebut, maka ketik “tabel” setelah “,”. Dan terakhir, excel akan meminta kolom yang menjadi isian fungsi “vlookup”, dank arena nama merupakan kolom kedua dari, “tabel” maka isi dengan angka “2”. Dengan cara yang sama, isi juga nilai, ip, dan dosen wali. Coba cek, jika NPM diganti, Nama, nilai, ip dan dosen wali harus berubah mengikuti table yang ada pada Sheet “DATA”.


Perhatikan, IPK harus diturukan menjadi dua digit di belakang koma. Untuk gambar di atas buat menjadi “2.22” saja. Dan terakhir kita membuat formula “Max SKS yang bias diambil =” dengan menggunakan fungsi “If “.

Untuk perintah if ketik:
=IF(G12>3;24;IF(G12>2,5;21;IF(G12>2;18;IF(G12>1,5;15;12))))

Misal sulastri, IP 2,2 maka max sks yang bisa diambil = 18. Jika tidak jalan, berarti Anda harus mengganti titik koma dengan koma dan pecahan dengan titik, menggantikan koma. Selamat mencoba, semoga bermanfaat, baik mahasiswa UNISMA ataupun kampus/sekolah lain, mohon maaf jika kurang berkenan, Salam


Rahmadya Trias Handayanto


Cloud Computing


Kantor-kantor yang sering kita jumpai biasanya menyediakan satu ruangan khusus yang berisi server dengan alat komunikasi yang lumayan banyak. Dengan AC yang super dingin dan terus dijaga kebersihannya, mau tidak mau, perusahaan menyediakan staf khusus yang bertanggung jawab akan kelangsungan sistem yang ada. Bagaimana jika server beserta piranti-piranti yang berharga mahal itu kita serahkan ke vendor-vendor dalam pengelolaannya? Tentu saja banyak ruang dan sumber daya yang dapat dihemat. Kita tinggal membayar vendor tersebut yang saat ini bahkan sistem informasi manajemennya juga telah tersedia dan bereslah semua urusan. Konsep tersebut dikenal dengan istilah Cloud Computing.

Tidak semua institusi saat ini berminat dengan cloud computing. Misalkan, data suatu perusahaan, tentu saja tidak serta merta bersedia menitipkan pada Cloud. Cloud computing bermaksud memberikan efisiensi dan efektifitas dalam memanfaatkan sumber daya. Misalnya, saat Anda ingin berangkat ke kantor, jika Anda menggunakan mobil, ketika tiba maka mobil Anda parkir dan tentu saja tidak memiliki nilai ekonomis karena tidak dimanfaatkan. Konsep Cloud Computing mirip ketika Anda ingin berangkat kerja, Anda memanfaatkan kendaraan umum. Tinggal bagaimana Anda percaya terhadap kendaraan umum tersebut. Untuk kondisi jalan dan armada yang masih amburadul seperti di Jakarta, tentu saja banyak yang tidak berminat. Begitu juga Cloud Computing, jika security, kecepatan akses dan sebagainya belum maksimal, selama itu pula orang belum berminat menggunakan Cloud Computing.


Salah satu contoh langsung adalah, tulisan ini ditulis menggunakan google (http://www.docs.google.com). Di mana file ini tersimpan, terus terang saya tidak tahu, tapi saya mempercayakannya kepada google. Jika komputer saya tidak terinstall Microsoft Office, maka saya masih bisa mengetik memanfaatkan salah satu aplikasi Cloud Computing ini. Saat ini saya sedang tertarik meneliti masalah ini. Chao …

Upload Tulisan di Blog Via MS Word 2007

Hari/tgl/MK/Ruang/Dosen/: Selasa/15-03-2011/Komp II/Sainstech/Rahmadya Trias, ST, M.Kom.

Pertemuan I:

Mata kuliah Komputer II merupakan kelanjutan dari MK Komputer I. Pada Komputer I, dipelajari dasar-dasar komputer untuk perkantoran seperti MS Word, Excell, Power point disertai internet dasar seperti pembuatan email, blog, e-learning, search engine dan sejenisnya. Sedangkan MK Komputer II bermaksud memberikan penguatan pada MK Komputer I berupa pengintegrasian Office dengan Internet, serta aplikasi berbasis internet lainnya.

Pertemuan pertama membahas cara-cara mengupload tulisan ke blog lewat Microsoft Office Word 2007. Manfaatnya adalah kita dapat membuat tulisan di blog dengan cepat tanpa membuka browser (Internet Explorer, Mozilla firefox, Opera, Safari, Netscape Navigator, Google Chrome dan sebagainya). Untuk itu siswa diharapkan sudah memiliki blog pribadi masing-masing (Blogger, WordPress, dan sebagainya).

Langkah pertama setelah selesai membuat tulisan adalah mengklik icon 
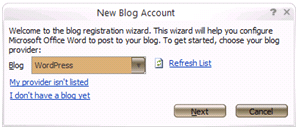
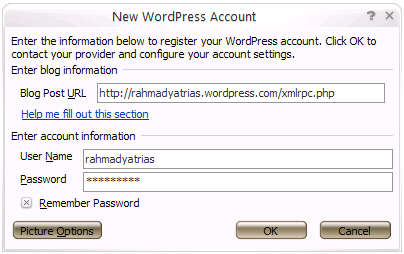
di pojok kanan word Anda. Kemudian pilih “Publish” dan dilanjutkan mengklik “blog”.

Selanjutnya Anda akan menerima jendela konfirmasi apakah langsung meregistrasi blog Anda atau menundanya. Klik “Register Now”.

Berikutnya Anda diminta memilih jenis blog yang Anda miliki. Berhubung Saya menggunakan wordpress, maka saya memilih wordpress.

Setelah mengklik “Next” maka Anda akan diminta memasukan alamat blog Anda beserta user ID dan Passwordnya. Di sini ada sedikit perbedaan antara blogger dengan wordpress. Pada wordpress Anda diminta memasukan juga alamat blog, sedangkan pada blogger Anda tidak diminta memasukkan alamat blog (sedikit lebih praktis). Khusus pengguna wordpress, masukan alamat blog Anda di tempat yang ditentukan dan jangan lupa tanda kurung “< >” dihapus terlebih dahulu.

Agar proses upload cepat, ada baiknya Anda mengklik “Remember Password”, tapi jika Anda menggunakan komputer umum sebaiknya jangan dicentang tapi dengan resiko diminta sering memasukkan user name dan password. Jika login berhasil, maka akan muncul pesan proses registrasi telah selesai. Berikutnya Anda tinggal memasukkan Judul dan kategori. Langkah terakhir adalah klik “Publish” yang berarti instruksi kepada word 2007 untuk mengupload tulisan Anda ke blog. Jika berhasil pada word Anda akan muncul pesan bahwa tulisan berhasil di upload. Selamat Mencoba !


MENULIS KALIMAT DENGAN TURBO ASSEMBLER

Hari/M.Kul/Ruang/Dosen: Jumat-24-12-2010/B.Assembly/L.Software/Rahmadya TH

Berbeda dengan debug yang alamat offset-nya ditunjuk dengan jelas (berupa angka). Pada Turbo Assembler offset ditunjuk berupa variabel yang nantinya akan dirubah secara otomatis oleh sistem (DOS). Berikut ini program contoh menulis satu kalimat:


Kemudian kita akan buat dengan Turbo Assembler. Buka kembali Notepad, ketik instruksi berikut ini:


Dengan Turbo Assembler, “Mov DX, 300″ diubah menjadi ” MOV DX, OFFSET Kal” dimana Kal merupakan variabel berisi data (DB) RAHMADYA. Perhatikan teknik pembuatan data “Kal Db …” dan lompatan (JUMP). Coba kompilasi dengan Turbo Assembler dan lanjutkan dengan linking.


Selamat Mencoba !!!


Rahmadya Trias Handayanto